7 Tips for Choosing a Sound Bar for Polaris RZR

Blog

7 Tips for Choosing a Sound Bar for Polaris RZR

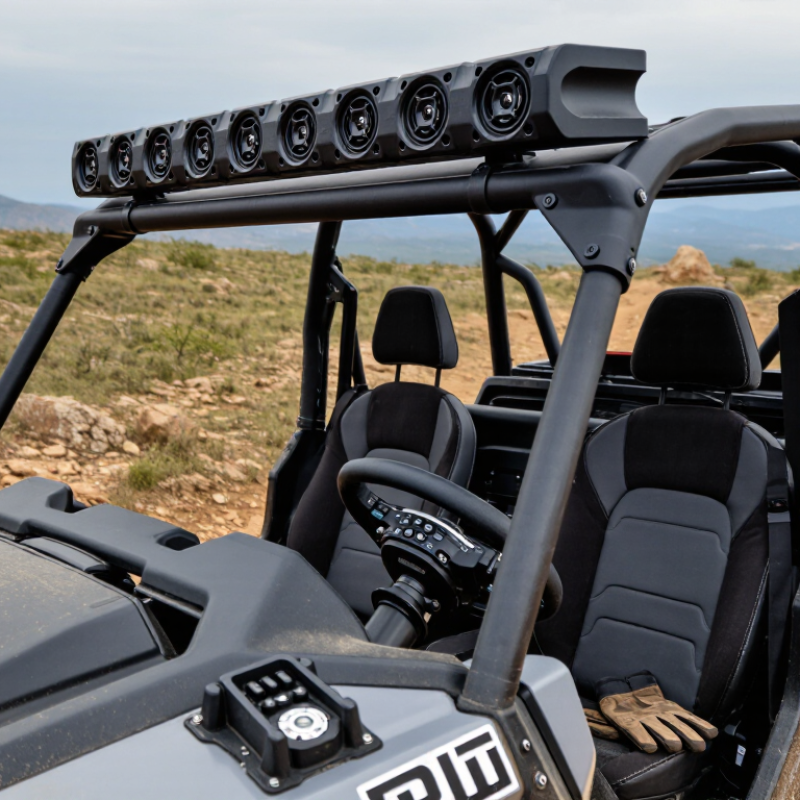
Choosing a Sound Bar for Polaris RZR requires more than chasing the loudest specifications. An RZR faces dust, vibration, mud, engine noise, and sudden weather changes. A model that sounds excellent in a quiet garage may disappoint on a rocky trail. Fit, durability, power efficiency, and control access all matter.

Audio reviewer Brent Butterworth offers a useful principle: “Good sound begins with the listening environment.” That idea applies strongly to an off-road vehicle. In an open cabin, bass can disappear quickly. Wind can bury vocals. A compact sound bar may need careful placement, not simply more power. The best choice should create clear music without forcing riders to use uncomfortable volume levels.

This guide explores seven practical tips for choosing a Sound Bar for Polaris RZR. It considers weather resistance, mounting space, Bluetooth stability, amplifier output, speaker layout, and battery demand. It also looks at controls that remain usable with dusty gloves. Small details matter. A loose bracket can rattle for hours. A poorly sealed connection can fail after one wet ride.

Some recommendations may seem obvious. They are easy to overlook. Personal listening habits also change the answer. A weekend trail rider may value balanced vocals, while a group ride may require stronger projection. No single sound bar fits every RZR setup. Even this guide has limits, because vehicle models, roof designs, and riding conditions vary. Measure the available space, inspect the wiring route, and check the product’s verified specifications before buying.
7 Tips for Choosing a Sound Bar for Polaris RZR

Identify Your Polaris RZR’s Audio Space and Mounting Options

Before choosing a sound bar, inspect your off-road vehicle’s actual audio space. Measure the usable width, depth, and height around the roll cage. A compact tape measure works better than guessing. Check the roof, rear cage, dashboard, and passenger area for possible interference. Doors, storage bags, and seat movement can reduce the available room. Leave clearance around controls and wiring.

Mounting points deserve equal attention. Look for strong cage sections that can support brackets without blocking visibility or access. Clamps should fit the tubing diameter securely. Bolts must remain reachable after installation. Avoid thin panels that flex when the vehicle travels over rocks or deep ruts. Vibration can loosen poorly positioned hardware. Use locking fasteners and inspect them after the first few rides.

Audio space is not only physical space. It includes water exposure, dust, engine noise, and airflow. Select a sound bar with suitable protection for outdoor use. Keep speakers away from direct spray when possible.

I once underestimated rear-cage vibration, and the sound became distorted on rough trails. That mistake changed how I evaluate mounting locations.

Test the planned position with the seats adjusted and the roof installed. A bar that fits in the garage may feel intrusive on the trail. Leave room for future wiring, because replacing a tight installation is frustrating.

Choose a Sound Bar with Suitable Power and Weather Protection

A sound bar for a Polaris RZR needs power that matches the vehicle, not just an impressive number on the box. Peak wattage can look attractive, but RMS power better reflects steady listening performance. For trail rides, a practical range often works better than extreme output. Too little power gets buried under engine noise. Too much can drain the battery during slow climbs or frequent stops.

I have found that clear vocals matter more than overwhelming bass outdoors. Test the unit at the driver’s seat, then check it from several feet away. The sound should remain balanced when the engine is running. Keep the volume below its harshest level. Distortion is tiring, and it may signal that the speakers are being pushed too hard. I once chose a louder setup and later regretted its muddy sound.

Weather protection is equally important. Look for sealed housing, protected controls, and a documented water-resistance rating. Dust can enter through tiny gaps, especially on dry trails. Mud splashes can reach the underside of the sound bar. Mount it securely above direct spray when possible, but do not block vents or wiring paths. After a wet ride, let the unit dry before covering the vehicle. Ratings are useful, yet real-world protection is never absolute. Temperature, vibration, and poor installation can still cause failures. Use corrosion-resistant fasteners and inspect the connections regularly. Loose wiring is easy to overlook.

7 Tips for Choosing a Sound Bar for Polaris RZR

Choose a Sound Bar with Suitable Power and Weather Protection

Use continuous RMS power as a practical comparison rather than peak watts. Higher-output systems can remain clearer in open or high-speed riding environments, but they also require more electrical capacity. For off-road use, an enclosure rated at least IPX5 is a practical target for water jets; IPX6 offers protection against more powerful water jets, while IPX7 refers to temporary immersion and does not automatically include jet protection.

The wattage figures are planning targets for different riding conditions. IP water-protection levels follow IEC 60529 terminology.

Match Connectivity Features to Your Devices and Riding Habits

Choosing a sound bar for a Polaris RZR starts with your devices and riding habits. If your phone is the main source, Bluetooth offers quick pairing and fewer cables. Check the connection range before buying. Dust, trees, and the vehicle frame can weaken signals.

For riders who store music offline, Bluetooth may be enough. Streaming riders should consider stable pairing and simple control access. A wired auxiliary input can help when wireless connections become unreliable. It also works with older music players. However, cables may snag near the dashboard, especially on rough trails.

I once focused too much on speaker volume and ignored connectivity. That choice made changing tracks frustrating with gloves on. Look for large buttons, clear status lights, and controls you can reach without taking your eyes from the trail. USB charging is useful during long rides, but confirm whether it supports playback or only power. Some units include microphone support for calls, though wind noise can reduce clarity. Test this feature in an open area before depending on it.

Riding in wet or dusty conditions requires sealed connections and protected ports. A removable cover is helpful, but inspect it regularly. Bluetooth pairing can also drain your phone faster than expected. Carry a charging cable, even on short trips. Two devices may connect, but switching between them is not always smooth. Check the manual and test your usual setup before installation.

Evaluate Installation Requirements, Controls, and Safety

Choosing a Sound Bar for a Side-by-Side

Installation starts with the vehicle, not the speaker. Measure the roof bar, seat clearance, and suspension movement before buying. Leave space for wiring bends and connector protection. A compact sound bar may fit, yet vibrate against the cage on rough trails. Use stainless hardware, locking nuts, and rubber isolation washers. Protect every cable with abrasion-resistant loom. Install an appropriately rated fuse close to the battery. IEC 60529 defines IP protection ratings, but real mud and water exposure can exceed laboratory conditions. Choose sealed connectors and a housing rated for outdoor use.

Controls need to work with gloves, dust, and engine noise. Large tactile buttons are safer than tiny touch controls. A wired remote can reduce reaching across the cabin. Keep volume changes brief and predictable. The U.S. National Institute for Occupational Safety and Health identifies 85 dBA over eight hours as a recommended exposure limit, using a three-decibel exchange rate. Off-road riding can become loud quickly, especially beside hard surfaces. Avoid testing maximum volume near passengers or trail users. Hearing protection still matters.

Check whether the unit supports stable Bluetooth operation, physical input options, and automatic reconnection. Route controls away from steering movement and emergency access. A rushed installation often looks clean but hides weak grounding or pinched wires. That deserves another inspection. Recheck bolts, cable tension, and sound performance after the first ride. Small rattles are warnings, not character.

7 Tips for Choosing a Sound Bar for Polaris RZR - Evaluate Installation Requirements, Controls, and Safety
Tip Evaluation Area What to Check Practical Selection Guidance Safety Consideration
1 Available Mounting Space Measure the usable width, height, and depth near the roll cage or other intended mounting location. Account for brackets, wiring, roof panels, seats, and passenger clearance. Choose a sound bar that fits within the measured space without blocking visibility, controls, storage access, or the movement of doors and seat belts. Do not mount the unit where it can interfere with the roll cage, occupant protection systems, steering, pedals, or emergency exit paths.
2 Mounting Hardware and Vibration Resistance Review the included brackets, clamp range, fastener size, locking features, and compatibility with the vehicle’s tube diameter and mounting surface. Prefer corrosion-resistant hardware and a rigid mounting system designed to resist vibration. The sound bar should remain stable during repeated bumps and off-road movement. Tighten fasteners to the hardware manufacturer’s instructions and recheck them after the first ride. Avoid drilling structural members unless approved installation guidance permits it.
3 Electrical Compatibility Confirm the sound bar’s operating voltage, current demand, fuse requirements, and connection method. Inspect whether the vehicle has a suitable accessory circuit. Select equipment designed for a 12-volt vehicle electrical system and use a properly sized fused connection rather than an improvised or overloaded circuit. Disconnect the battery before wiring. Route cables away from hot surfaces, sharp edges, moving parts, and pinch points, and protect exposed connections from moisture.
4 Weather and Dust Protection Look for a published ingress-protection rating or clear evidence of protection against water splashes, dust, and mud. Check the sealing of connectors and controls. For open-cab and trail use, choose a unit specifically described for outdoor powersports conditions rather than a household sound bar. Water resistance does not usually mean waterproof under pressure. Avoid directing high-pressure water at the sound bar, connectors, speakers, or control panel.
5 Control Access and Usability Evaluate button size, display visibility, remote-control range, Bluetooth pairing, volume adjustment, and whether controls can be reached while seated. Choose simple controls that can be used with gloves and without taking attention away from the trail. A wired or handlebar-mounted controller may be useful when the main unit is overhead. Pair devices and set preferred volume before driving. Never operate a phone or adjust complicated settings while the vehicle is moving.
6 Audio Performance in an Open Cabin Consider speaker direction, power output, frequency balance, sound clarity at speed, and resistance to wind and engine noise. Avoid judging performance only in a quiet garage. Favor clear vocals and controlled sound at moderate volume. Excessive volume may distort the audio and can reduce awareness of surrounding vehicles, people, and trail hazards. Keep the volume low enough to hear horns, approaching vehicles, warning signals, and verbal communication with passengers or trail users.
7 Maintenance and Long-Term Durability Check the accessibility of fuses, connectors, mounting bolts, and drain or ventilation points. Review cleaning instructions and the availability of replacement hardware. Select a design that can be inspected easily after muddy or dusty rides and that does not require frequent removal for routine cleaning or wiring checks. Turn the system off before cleaning or servicing. After wet or dusty use, inspect the mounts, cables, connectors, and speaker grilles for damage or looseness.

Compare Sound Quality, Durability, and Overall Value

7 Tips for Choosing a Sound Bar for Polaris RZR

Compare sound quality, durability, and overall value before buying a sound bar for your Polaris RZR. Check RMS power, not exaggerated peak wattage. Higher RMS usually provides steadier output when wind and engine noise rise. Listen for clear vocals, controlled bass, and low distortion. A wide frequency response helps, but numbers alone can mislead. Outdoor testing matters more. Look for balanced sound at the driver’s seat, not only beside the speaker. Keep volume sensible.

NIOSH’s Criteria for a Recommended Standard: Occupational Noise Exposure identifies 85 dBA over eight hours as a recommended exposure limit, using a three-decibel exchange rate. Off-road cabins can become loud quickly.

Durability deserves equal attention. Choose sealed connectors, corrosion-resistant hardware, and an enclosure tested against dust and water. IEC 60529 defines IP ratings; an IP67 enclosure is dust-tight and rated for temporary water immersion. Still, ratings do not guarantee survival after repeated impacts. Check vibration testing, mounting strength, warranty length, and replacement-part access. That detail is easy to ignore.

Value means more than the lowest price. Add installation time, wiring, brackets, and possible repairs. A cheaper unit may cost more after one harsh season. SAE J1455 environmental testing guidance can help you judge vibration, temperature, and moisture claims, although it does not certify every product. I would also compare measured output at one meter, return policies, and real user evidence from dusty trails. Marketing claims remain incomplete without test conditions.